
“Uh-oh” Photo: picsofyou.com
Perhaps it’s that moment of excitement opening your first box of real race bodywork, or looking behind the tire wall outside turn 4 for pieces of your tail section; it is inevitable that you’ll eventually need to paint your race bike. There are a number of ways to approach this, depending on one’s vanity, sanity, disposable income, and time.
DIY rattle can approach. Cheap, fast, easy touch up in the paddock, or on the trailer. Can be sprayed right over crash damage and racer's tape. The down side is that it looks like what it is. Though one should bear in mind that a really awful looking bike makes you look good when you win, and can be used as an excuse when you suck. If you do choose this approach, I recommend Dupli-color satin engine paints. I think it says “500 degree” on the can. Lays out well, and the tasteful understated sheen de-emphasizes imperfections. Like the huge freakin’ hole in your lower…
DIY acrylic automotive enamel. This consists of a colored acrylic paint which is mixed with a hardener and reducer and sprayed over primer. You can leave it as sprayed, or wet sand and buff it if you’re picky. It looks shiny and professional in the slowest corners to the nearest spectators, which is the objective of this whole exercise. It costs more than spray cans, takes longer, and requires a decent compressor, spray gun, organic vapor respirator, gloves, safety glasses, and a modicum of skill, or an easily tricked friend or associate with the necessary skills and tools. It stays on the bike better when you crash, doesn’t come off like spray paint when you peel off stickers or when your “helper” dumps Nutec all over the bike.
DIY solvent-based basecoat/clearcoat. This is what’s on your car, and what shops use. An air dried color base coat is sprayed over primer, followed by several coats of clear on top. It looks like a new street bike finish. The downsides are that the materials are very expensive and bad for you (urethane clear is full of isocyanates, which are nasty neurotoxins) and it’s difficult to use. Your prep work needs to be perfect, and clear is hard to shoot without perfect light. If your racebike is nice enough to warrant the expense of a base/clear paint job, it’s probably worth paying someone to subject themselves to the misery and physical peril.
DIY aqueous-based basecoat/clearcoat. Some states have stringent regulations governing the permissible level of volatile organic compounds (V.O.C.) emitted when solvent-based paint “flashes off”. In these areas the use of low VOC materials is required. This encompasses low VOC primer, base and clear coat, and possibly aqueous (water base) base coat. The downside of aqueous base coat is the film thickness deposited is much thinner than solvent based, around .0005” vs. .003 - .005” per coat. This mandates flawless preparation such as a surface wet sanded to 600 grit, minimum. But it appears that online sellers of automotive paints will still ship conventional materials to individual users in California which has the tightest regulations, so at our level it’s likely not an issue.
Professional help. Most people need it, so few seek it out. Finding a body shop or painter to do your stuff can be tough. Compared with insurance jobs painting bumper shells and fenders, shooting a set of motorcycle bodywork is an immense pain. It’s all corners, scoops, edges, and ducts, you need to hang the stuff all over while you’re working; and, if they’ve ever done a GSXR street bike, they’ll never, EVER, touch another motorcycle. Shops that specialize in bikes charge a fortune since they know what they’ve gotten themselves into, and generally are doing 6 color flip-flop fades on ZX-10s and those very profitable gothic/baroque stripper motif Harleys. They don’t have time to stop printing money while they spray your 5 pieces of gnarly, oil soaked, rashed-up fiberglass.
When AOD decided to join the ranks of the actually-painted, I used acrylic enamel since I liked the stuff, and happened to have all the solvents and reducers on hand. With each successive season I’ve realized that the stuff is really good for racebikes, and easy enough to use that a reasonably handy neophyte can produce a not-unattractive result. Here’s how to paint your racing motorbike.
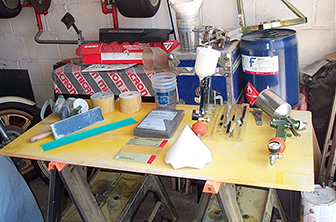
The first step is to locate your nearest auto body supply store. I generally use PPG brand paints, but since you’ll find that any given retailer is aligned with one particular brand of products, I’ll use generic terminology for what you’ll need.
Abrasives. You’ll need to make things either smoother or rougher, so get some 180 and 400 grit. I like the self adhesive rolls, but packs of 3M Sandblaster brand sheets are fine. Those purpose built flat board sanders work well, but are a bit spendy. They sell a small sanding block which is soft neoprene foam on one side, harder on the other, which is quite useful. Get some fine and medium Scotchbrite pads too. They’re a garage necessity anyway.
Cups, sticks, and strainers. You’ll sound like a pro if, after stumbling through all the stuff you need at the paint counter, you nonchalantly say “oh yeah, I’m low on cups, sticks, and strainers, too.”
Solvents and reducers. You adjust the speed at which your paint dries by the evaporation rate of the reducer you choose. Typically there are temperature ranges spanning about 20 degrees. It’s nice to have slow, medium, and fast around just in case, but you can get by with medium if you only buy one. Get a gallon of lacquer thinner for reducing primer and cleaning up. Get some prep solvent for wiping everything down before you paint.
Paint and hardener. A quart will do several sets of bodywork. Ask for acrylic automotive enamel. PPG calls it Delstar, and they have a cheaper line of products called Omni, in which case it’s called MAE. Get the cheap stuff. Hardener comes in small cans. Buy the least they’ll sell you, a ½ pint if possible. Cap it tightly to preserve it. Ask for material data sheets with mixing and use instructions.
Primer. Lacquer primer is easy and cheap. Buy a quart. I’m not sure you can still get lacquer in California, so if you’re from Cali, either drive to Nevada, or use whatever the guy in the paint store recommends.
Masking stuff. Get real tape for masking your number plates. For paper, if you must use newspaper, use a couple plies, otherwise get real masking paper, or use brown kraft paper.
Get a pack of disposable filters. They are used at the gun to catch any moisture or oil before it ruins your day and your paintjob.
Tack cloths. Get a few of the real professional ones while you’re there.
Paint measuring stick. This is an aluminum graduated stick which will allow accurate mixing of any quantity of material. It’s like a Ratio-Rite for paint. What? You never raced a 2-stroke? Poseur…
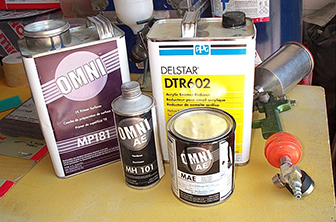
Lacquer primer, enamel hardener, medium speed reducer,
Official AOD Black, Sata Jet spray gun

Hardware and other consumables:
Compressor. I like oil-less compressors, since there’s no oil blow-by. I’ve been using a 5 hp / 30 gallon for air tools and painting, and while it runs continuously while porting a head, it can keep up with a conventional spray gun.
Spray guns. There are two basic types, conventional, and HVLP (high volume low pressure). Essentially HVLP guns atomize at a lower pressure, and deposit more paint on what you’re trying to spray, and less in the atmosphere. Conventional guns, conversely, produce a prodigious cloud of noxious fumes, but really lay out paint nicely. The state in which I live requires shops to use HVLP guns now, so I procured two nearly new Sata conventional gravity feed guns from a shop which was changing over to HVLP, for about the cost of your first 2 sprint race entry fees. They are wonderful to use, and I’ll give them up when they pry them from my cold, lifeless fingers. For you California types, the penalty for possession of a conventional spray gun exceeds that for unlawful possession of a class 4 automatic weapon so your choice is easy. Get a gravity feed gun, which has the paint cup on top. It’s way more convenient than the under-slung variety and feeds better. A decent gun starts at about $200, and if I had to recommend one to a beginner, I say to get a DeVilbiss Finish Line gravity feed gun as in the picture above. I recommend avoiding the reverse-engineered Chinese copies of Sata guns which sell for under $50. Parts availability is spotty-to-nonexistent and the few I’ve tried weren’t conducive to achieving a consistent spray pattern. Your materials and time will cost more than a decent gun. Don’t cheap out here. Note the disposable filter and on-gun final regulator, which is actually just a needle valve to control airflow.
Cleaning brushes. You’ll need to thoroughly disassemble and clean your gun at the end of the painting session. If you use it daily, you can rinse and cycle lacquer thinner through it and leave it wet, but occasional users need to store it clean and dry. Follow manufacturer’s instructions. A cheap set of cleaning brushes are really a must, and don’t booger up the spray tip by poking a piece of brazing rod in there.

Preparation is literally 90% of a good paint job. If you’re starting with a new set of race bodywork which is pre-primed, sand all of it with 180 followed by 400, so there is no visible orange peel texture. Existing factory paint needs to be scuffed with a Scotchbrite pad until it is uniformly dull. Dents? Sand with 80 grit, fill with auto body filler, shape with 80 grit, skim with a second coat of filler, shape with 180. Patching fiberglass is an entire other article, but in short, grind the edges smooth, tape a trash bag-wrapped cardboard “mold” on the outside, and lay up polyester resin and a layer or two of fiberglass cloth and a couple layers of mat inside the afflicted panel. Be sure to get all the oil residue off first with solvent. If no one has told you this before, pay attention. The peroxide hardener used for polyester resin will blind you in an instant, and there is no remedy. Wear maximum eye protection. Skim the visible side of the repair with filler once it hardens. Sand, fill repeat. Stickers? Peel them off. A hair dryer or heat gun on low helps. Wash off the adhesive residue with lacquer thinner. Reflective stickers can require 3M adhesive remover. The objective of all this is for the whole mess to be absolutely smooth and not shiny anywhere. Once everything is ready, wipe everything with prep-sol and clean paper towels. Find a way to park or hang every piece in the garage or some covered space, and do so now. Frantically trying to MacGyver some sort of hanging fixture with a wet, shiny fairing upper in one hand and a spray gun in the other is exciting, but ultimately counter-productive.
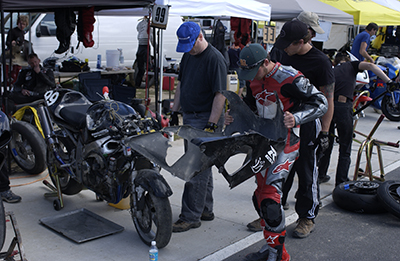
Eric gets to buy more black paint. Photo by IYFPHOTO.
If you’re refinishing old stuff, you’ll need to prime everything now. This is probably good practice for spraying color anyway. Mix your primer according to the manufacturer’s data sheet, and strain it into the gun.
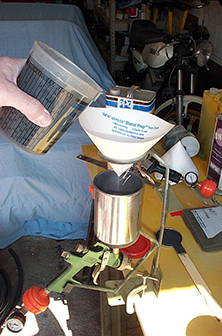
If you are using a gravity feed gun, one
of these stands with the integrated strainer
hoop makes the process a bit easier.
Disconnect your air hose first. It's possible
to trip on the hose and yank the gun
and its uncovered cup full of paint out
of the stand with the obvious disastrous result.
Set your air pressure at the regulator on the compressor. Leave the one at the gun wide open for now. Remember to account for hose length related pressure drop. I use a 50’ x 3/8” hose, and set 40 psi for my HVLP gun, and about 60 for my conventional gun, at the compressor. Test spray on a big piece of cardboard, while looking at the pressure gauge on the gun. The pressure will drop and stabilize a second after you pull the air trigger. Adjust the gun regulator if you need to lower the gun pressure, adjust the compressor regulator up if you need more pressure at the gun. I usually look for 20-25 psi for HVLP and in the high 40s or low 50s for conventional guns. Run your air hose uphill from the compressor and back downhill to where you’re painting. I snake mine over a rafter. It keeps moisture from traveling down the hose and crashing the painting party. Lastly, don’t forget to drain your compressor tank as well as the trap at the regulator before you begin.

Now you’ll set your flow rate and fan setting. The knob on the rear of the body in line with the nozzle is a mechanical stop for the rearward travel of the needle. It controls the volume of paint the gun can flow. It is in essence the main jet. The other main adjustment is the fan. This controls the width of the spray pattern. Typically you’ll narrow it for spraying areas like ducts, edges and fastener recesses, and widen it for spraying larger areas. The oval and spot pictured are what spraying for 2 seconds full wide and full narrow look like. Practice on your cardboard for a while. It’s important to set the gun so that once you’re actually painting, you’re not using the trigger for control; you want the knobs set so you just pull the trigger, and move the gun smoothly past the part, keeping the gun a uniform distance from the surface, and controlling the amount of paint deposited by the speed at which you move the gun.
This is the serious cautionary part of the article. Organic solvents are not good for us despite the assertions of no lesser authorities than the Ramones. It is essential to wear a full complement of personal protective equipment. An organic vapor respirator with fresh filter cartridges is a must. I finally bought one of those full face window hazmat-looking things, and it’s comfortable, keeps my contact lenses from loading up with overspray, and scares the hell out of my neighbors. Despite the fact that I appear barehanded in the photos, I always wear nitrile gloves. They don’t last long when soaked in lacquer thinner, but I work in the bio-tech field, so they’re a bargain. When you’re sanding paint, primer, or especially composites, wear a good dust respirator rated for the toxin you’re trying not to permanently store in your lungs. Wear long sleeves and pants, and try to cover your head as much as possible. This stuff will get in through your skin, including your ears, tear ducts and sinuses.
A word on overspray: It will cover absolutely everything you own. I can date the contents of my garage by the striations of overspray on everything. Anymore, I park all the bikes in the back yard, and the cars around the corner. I hose down the driveway so the paint doesn’t stick to it and paint in the front yard.
Bring your least visible panel outside, and place it on your purpose built painting table.
I like to use a big piece of plywood on sawhorses. Wipe the part down with real regular Windex and a fresh paper towel, followed by a thorough wipe with a tack cloth. Set the gun for a narrow spray pattern, and begin by shooting all the edges from the inside. Next, from the outside, spray all the features like scoops, case clearance holes, and radiator shroud edges. Finally, with the part resting upside down, using a wide spray pattern, finish with long overlapping strokes. You don’t need to cover with one coat. Go over the whole part methodically, wait 5 minutes for the primer’s solvent to flash off, and spray the second coat. Repeat this process for each successive part. I usually use this sequence:
1) Lower
2) Front Fender
3) Upper
4) Tail Section
5) Tank
As you finish each part, hang it up to dry. In the same order you sprayed everything, sand each part you primed with 400 grit. Use the fine Scotchbrite for the fussy hard-to-reach bits. Inspect everything very closely. If there are any visible imperfections, this is the time to fill, sand, and re-prime everything. If you break through the primer when you’re sanding, you can leave it, unless bare metal is exposed, in which case give it a quick squirt of the grey stuff. When you are sure you won’t lose sleep over your preparation, wash the gun out with solvent, and take a break for a few minutes.
If you’re painting number panels, you’ll follow the painting instructions, and shoot the center of the upper and sides/top of the tail section white or yellow with no masking. Let it dry overnight, and mask the number panels with tape and paper before continuing with the balance of the paint job. I like to lay long strips of 2”masking tape on a big panel of glass, and cut them in half with a straight edge and fresh #11 X-Acto blade. These perfect edges never bleed. Burnish all your taped edges with a thumbnail, or better yet, the end of the barrel of a Sharpie marker.
If you’re painting AOD and NOTB bikes, this is when you’d mix 2 quarts of black and have at it. Otherwise…
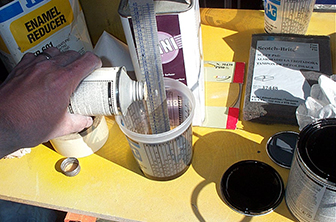
Ready? Gather your paint, hardener, material data sheet, reducer, and measuring stick. Follow the manufacturer’s suggestions for ratio of paint, hardener, and reducer. If, for example, you were to use 8 parts paint to 6 parts reducer to 1 part hardener, you’d put the measuring stick in the cup and choose which of the 4 scales on the stick will yield the quantity of material you want. For a set of typical modern sportbike bodywork you’ll want about 20 oz, mixed, maybe a bit more. You would pour paint up to the 8 line, reducer to the 14 line, and hardener to the 15 line. Stir the mixed paint for a full minute, and let it sit for 10 minutes before you begin spraying.
Bring out your least conspicuous part, give it a thorough wipe with Windex and a clean paper towel followed by the tack cloth. Check your gun pattern, paint flow rate and pressure on your big piece of cardboard. Make sure the air bleed hole in the top of the cup is unobstructed. In the event that the paint flow becomes weaker and weaker, always check that first.

Repeat the process you used when priming. Narrow pattern, cut in all the edges from the inside, hit all features from the outside, and finally a light coat using a wide fan pattern and long, smooth, overlapping strokes. The gun ALWAYS remains square to the surface. When you’re painting properly you look like you’re doing the robot, which is sort of fun, especially if your neighbors and passersby are watching. Again, the first coat should be quite light, and allowed to flash off for 5 or 10 minutes before shooting the second coat. If you’re happy with the coverage or you’re painting a 125, you can stop at 2 coats. I usually try for 3 if there is time, and always do 3 on tanks, since they tend to stay painted longer than the rest of a race bike. Once again, paint the parts either in the order you primed them, or in order of how noticeable they are on the bike. If a bug lands on the wet panel, leave it until the paint is dry; it’s much easier to deal with then. It can be useful to drape the air hose over your shoulder so you don’t drag it across your perfect, wet part.
Try to work methodically, pause to relax and look at what you’ve done periodically. If you see a run, sag, or drip developing in a part you’ve finished, let it go. You can wet sand it out with 400-600-1200 grit and rubbing compound once the part dries. After everything is sprayed, and you’re certain you don’t need to re-shoot anything, disassemble your gun into a cup full of lacquer thinner, and clean up the colossal mess you’ve made while it soaks. Clean all the bits with brushes, solvent, paper towels, and compressed air. Use the little pot of gun lube that came with the cleaning brush set to lubricate the needle before you put it back. If you can tell from looking at the disassembled gun what color was most recently sprayed, it’s not clean enough.
Let everything dry overnight. It’s generally better to install windscreens before putting the upper on the bike. Stickers are best done after everything is mounted. If you didn’t have the fill and fuel pump holes in your tank taped up, blow out the tank with compressed air followed by a shop vac. Contrasting 1/8” striping tape from the paint shop can make your number panels look really nice. Now invite your friends over to stand around the garage admiring your bike while it still looks nice.
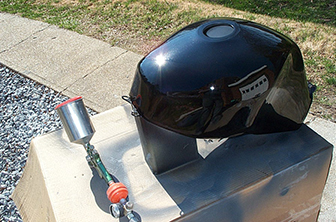
Before, or is it after?
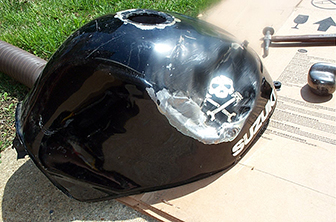
After, or is it before?
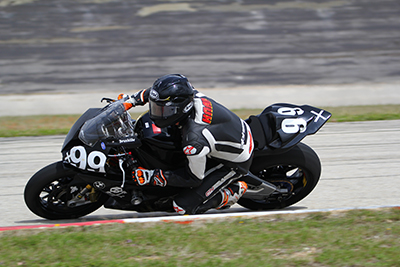
Taylor Knapp takes pains to avoid dragging the beautifully painted lower
on the curbing. Blair Hartsfield Photography
