Damage Control: Preparing the Chassis for Unplanned Events
We like to take pictures of the race bikes at the beginning of each season, just after we've finished prepping them and before they've even been loaded into the trailer. Why? Because Hilde loves to Snapchat. Just kidding. It's because chances are, they will never look that good again. You have to borrow a page from Buddhism when you spend countless hours (and many dollars) meticulously attending to every minute detail that goes into transforming a streetbike into a competitive racebike, because it can all go so wrong so fast. You can't get too attached, because attachment leads to suffering, and suffering leads to the dark side, otherwise known as Jar Jar Binks. However, there are some chassis modifications you can make to help prevent problems from occurring and minimize the damage when things do go wrong, that generally fall under one of these four categories: clip-ons (handlebars), footpegs, frame savers, and safety wire.
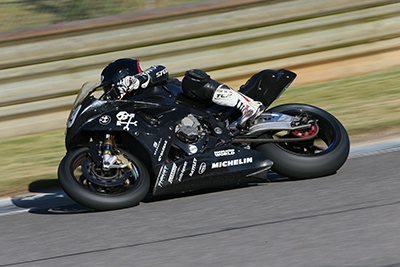
Just because the bike is crash-prepped doesn't mean you need to test
those preparations. Here Ben flirts with the limits without exceeding them.
Photo by Brian J Nelson.
CLIP-ONS: these replacements for the stock handlebars are basically just aluminum tubes with clamps that hold them onto the forks, and they can be very valuable in a crash. Usually, the bar is longer than a stock handlebar and can be adjusted to help keep your fancy paintjob and expensive graphics from being ruined when the bike is sliding on its side. The extra length also gives you more adjustability when positioning your brake and clutch levers so the levers don't extend beyond the ends of the bars into vulnerable break-off territory.

An easy way to avoid a crash is to always remember to flip up your
kickstand before you head out on the track. Alternatively, you can just
remove the side stand. This is probably the better option.
The clamps can be adjusted to hold the bar out at different angles as well so you can tune the amount of leverage you have for turning while ensuring that your fingers won't get crushed against the frame in a lock-to-lock headshake situation.
Also, unlike stock one-piece handlebars where the clamp and the bar are all one piece, clip-ons allow you to replace just the bar, a simple and comparatively inexpensive alternative to replacing the complete stock handlebar. To replace a clip-on bar after a crash you generally only need to loosen the bolts on the controls (front brake and throttle, or clutch, depending on which side you're replacing, plus the switches) and on the bar itself, slide the bar out, slide a new one in, adjust and tighten everything down.
Another benefit of clip-ons is they are generally lower than stock handlebars, which helps you tuck in better behind the windscreen to cut a lower, more aerodynamic profile.
FOOTPEGS: solid footpegs can work like clip-ons to help prop the side of the bike up off the ground (and potentially also your foot) when it is busily trying to shed weight the hard way on its side. We always replace stock folding footpegs with solid ones anyway because we find the footpegs are always folding at just the wrong time, like when sliding the ball of your foot back up onto the peg after shifting, which is very disconcerting if you are shifting in a left turn.

Looking for a starting point for shift pedal height with
a new shift rod and quick shifter switch. This rod came
with relief cuts already cast into it to assist with finding
the right rod length with a hacksaw and file. We ended
up trimming these for the BMWs.
You can get away with just replacing the pegs and using the stock footpeg brackets but we replace the stock footpegs and mounting brackets with rearsets, which are more versatile. Rearsets allow you to change the location of the footpeg to satisfy rider preference (for instance, for riders with exceedingly short or long legs, a la White Chocolate vs. Taylor Swift) and to help keep your toes off the ground in turns. Rearsets also facilitate riders who prefer the reverse shift pattern (a.k.a GP shift) as we do, which is the only reason that Kevin Schwantz has not been a guest AOD rider.
FRAME SAVERS: Frame savers are one of those inventions that, when it appears, causes you to wonder why no one ever thought of that before. Like suitcases with wheels. Your average frame saver is (hopefully) made out of a durable plastic like Delrin (the nylon ones tend to just bend instead of slide), with an aluminum sleeve that the attaching bolt slides through. In the past we've used ones that bolt onto either side of the frame using long bolts that replace two engine mounting bolts on the head, and stick out just far enough to keep some space in between the side of the bike and the ravenous pavement longing for the chance to devour your tasty engine cases. Don't let it.

A steering damper mounting bolt awaits bondage with safety wire.
Grinding a flat spot on the head of these kinds of rounded bolts can
make it easier to start the safety wire drill hole.
If your bike is one of the models that suffers from a fuel tank clearance issue (that is, clearance between the tank and the ground when the bike is on its side), you may also consider tank sliders. These can help prevent ugly scars as well as spectacular conflagrations that can occur if the tank takes a hit. Some racing organizations require these for specific models on which these tank grenades are installed so check your rulebook.
SAFETY WIRE: In order to protect us from ourselves and each other, racing organizations have certain minimum machine requirements that all motorcycles must meet in order to be approved for track use. Each organization has its own rulebook detailing that organization's machine requirements. The rules vary from one rulebook to another, but all organizations require some level of safety wiring, which involves drilling holes in the heads of bolts and twisting wire that you pull through the holes to tie to something immobile.
The theory behind safety wire is that, if a bolt on your bike tries to come loose while you're on the track, the wire will prevent the bolt from unscrewing all the way and falling off the bike or loosening enough to allow water or oil to leak out.

Always wire your oil drain bolt, even if your racing or track day
organization doesn't require it. While you're at it, don't forget to
wire your oil filter too.
Installing Your Clip-Ons
Step one in the process for removing your stock handlebars and replacing them with clip-ons is removing the bar end weights. Bar end weights come stock on most motorcycles and work to damp vibration in the bars. Racers relish the bar vibration, so these must be jettisoned. Actually, the real reason we don't use these is because they prevent you from sliding the throttle and controls off the bar easily and quickly. And being weights, they add unnecessary, well, weight.
We've found the best way to remove them is with an impact driver, as often the bolts are loctited in and the heads can strip all too easily. Give the bolts a few good whacks with the impact driver as necessary and unscrew and remove the bar ends. If the bike you are race-prepping is a BMW with heated handgrips, you should take some time and enjoy the excuse to hit the bars with a hammer now, before you are confronted with the seeming impossibility of removing the heated grips and the rageor takes over. The following instructions do not cover those steps, as that text is for mature audiences only due to strong language and violent content.
If you don't have another left bar grip handy you'll need to carefully remove the grip from the left handlebar. It's usually glued onto the bar but if you're patient and careful, you should be able to remove it intact so you can reuse it. You can use a long, thin flathead screwdriver and some contact or brake cleaner with the straw that comes with the can. Gently work the end of the screwdriver between the grip and the bar and push it up the bar a little. When the screwdriver is about halfway up the grip, insert the straw under the grip and squirt a little cleaner in. Work the screwdriver around the bar to start breaking the glue and squirt some more cleaner in as you rotate the grip. You should be able to break the glue and rotate the grip all the way around, sliding it off as you go. You can use compressed air instead of contact cleaner but we've had better success with contact cleaner.
Next, loosen the bolts holding your clutch lever mounting bracket and front brake master cylinder assembly, unplug the clutch and front brake switches, and remove the bolts holding your turn signal/headlight/horn and start/kill switch assemblies. At this point you can probably* unplug the headlight switch assembly from the wiring harness and remove it entirely from the bike since you won't need it for racing (unless you feel the need to honk at people while you're passing them or crashing into them), but you will need to bypass the clutch switch in the wiring harness.
*Beware of bikes with complicated or CAN bus electronics, as even unplugging something as benign as a headlight switch assembly can trigger a tantrum of flashing lights and recalcitrant running conditions. In this case, a fun game of trial and error with re-connecting and then sequentially unplugging the superfluous switches in some specific order should eventually satisfy the CAN bus gods.
If your stock handlebars mount above the top triple clamp, you can now remove the handlebar mounting bolts and remove the handlebars, sliding the clutch lever assembly, throttle tube and kill switch assembly, and front brake lever assembly off the bars as you remove them. If your handlebars mount below the top triple clamp or your clip-on clamps are one-piece, you will first need to remove your steering stem nut, loosen the upper triple clamp pinch bolts that secure the upper triple clamp to your fork tubes, and gently tap the upper triple clamp up and off the forks and steering stem. Some bikes also have handlebar locating screws that attach the bars to the top triple clamp to keep the bars oriented to a specific angle. If your bike has these, make sure you unscrew them from the top triple clamp before you remove the clamp or you might get trapped in the always-entertaining game of “Why won't this just come off?” Then loosen the handlebar mounting bolts and remove the bars.
Now you're ready to install your clip-ons. Slide or set the clip-on clamps onto your fork tubes and lightly snug down the bolts such that you can still move the clamps, but with some resistance. If you removed your top triple clamp, you can re-install it now so you know where to locate the clip-on clamps vertically on your forks. Tap the triple clamp back onto the steering stem and fork tubes, and tighten the steering stem nut to the factory torque specification. Then tighten the pinch bolts around the fork tubes and slide the clamps up so that they touch the triple clamp.
Next, slide the left handlebar tube through the clutch lever mounting bracket and into the clip-on clamp, and lightly snug the handlebar bolt. Then, slide the right handlebar tube through the front brake master cylinder assembly and into the clip-on clamp and lightly snug the handlebar bolt.
If you look inside the kill switch assembly, you should see a little pin that sticks out where the assembly fits around the handlebar. That pin fits into a hole in the stock handlebar and locates the switch assembly on the bar to prevent it from spinning when you turn the throttle.
When you're replacing a bent handlebar after a crash under a green flag, you will curse that pin. Crash repair can go a lot faster if you don't have to worry about aligning the pin with the hole you would need to drill in your replacement bar. Our solution is to grind the pin off with a Dremel tool or die grinder and knurl the bar instead (you may want to get a machinist to knurl the bar for you). To do this, first unhook the throttle cables from the throttle sleeve and remove the throttle sleeve from the switch housing. Grind the pin down just past flush with the housing, and reattach the throttle cables. Then slide the switch and throttle assemblies onto the bar and lightly snug down the bolts.
At this point everything should be bolted loosely enough that it can still be adjusted. Turn the front end all the way to the left side until the steering stop hits. Grasp the left bar and angle it so that there is about one inch of space (enough room for your fingers to fit) in between the bar and the gas tank or frame, and tighten the clip-on clamp. Do the same with the right side. If you maintain at least a one-inch gap on both sides you can keep from busting your knuckles during a bad tankslapper as well as avoid crushing your fingers moving the bike around in the pits.
Next, adjust the length of the bars by sliding them in the clip-on clamps. Start by setting the right bar out far enough so that with the throttle grip at the end of the bar, there is enough room to position the brake lever so the end of the lever is just about level with the end of the bar. Then measure the exposed length from the clamp to the end of the bar and set the clutch side to match. Once you have the bars set at the desired length, tighten the bar bolts. You can then install your left bar grip, using a little contact cleaner on the inside of the grip as a quick-drying lubricant. Slide the grip onto the bar until the end of the grip meets the end of the bar. We don't glue the grips onto the bars. We find safety wire works fine for keeping the grip on and comes off cleanly and easily when you need to replace the handlebar but reuse the grip.
Now, adjust the brake and clutch lever attitude. Set the levers wherever they feel the most comfortable for you. Check them while tucked in as well as sitting up. Then tighten the lever bolts. Usually you want a straight shot from your forearm down to the lever when you are in a sitting up and braking position. Too high or too low and you might end up with aching wrists or grasping for the levers that are set up just out of comfortable reach.
At this point, everything should be tight except for the kill switch/throttle assembly. Turn the bars all the way to the right and check the clearance between the kill switch and the frame. You may need to rotate the switch assembly around so that the starter button doesn't hit the frame, and the brake lever, when pulled in all the way, doesn't hit the throttle cables. If you can't get acceptable clearance between the switch housing and the frame and brake lever, you may need to angle the bar out further by rotating the clip-on clamp.
Check clearance between the levers and fairing bracket/instruments when the bars are turned towards them as you do this. Make sure you tighten the switch housing and double-check all of the other mounting bolts when you are done. If you have a remote front brake master cylinder reservoir you may need to either make a new mounting bracket or get a longer hose for it if the clip-ons put the reservoir out of reach of the stock mounting position without making those adjustments.
After everything is adjusted and tight, you can make forward facing vertical relief cuts with a hacksaw near the end of the clutch and brake levers to encourage the tip to break off, rather than the whole lever, in case of a crash or contact with another bike. Alternatively, you can install a folding brake lever, or a brake lever guard that bolts onto the end of the bar and protects your brake lever from getting snagged by or accidentally squeezed against another bike, an unwelcome surprise that can have disastrous consequences. Just ask Steve Rapp.
You can also mark the orientation of the clip-on clamps against the upper triple clamp with a marker, some paint, or a small punch so if you need to unbolt the clip-on clamps, for instance if you are removing your forks, you don't need to start the alignment process from scratch.
Once you've got your bars adjusted just the way you like them, you can measure the exposed length and cut spares from aluminum stock. We get our stock from McMaster-Carr (www.mcmaster.com, 6061 aluminum tubing, 7/8" diameter, .065" wall thickness, in 3 or 6 foot lengths: part #89965K661).
Installing Your Rearsets and Footpegs
If you bought rearsets, odds are they came with some installation instructions, and maybe they even came assembled, but if they didn't, here are some general guidelines. If you bought footpegs only, you'll still need to remove your footpeg plates to install them so most of these instructions will apply. You will need blue loctite.
First, unbolt your rear brake master cylinder and disconnect it from your brake pedal. If your brake light switch is still connected, unplug it from the wiring harness and unbolt and remove the right footpeg plate. On the left side, remove your shift rod. One of the locknuts on the shift rod is left-hand thread, so look at the threads to figure out which way to turn the nuts before trying to break them loose. Then unscrew the rod. Unbolt and remove the left footpeg plate.
Next, clamp the right footpeg in a vice. If you are using the stock footpeg plates on your racebike, you can remove the brake light switch. Remove the footpeg bolt and lift the footpeg plate off the footpeg. Then remove the brake pedal along with any associated washers, making a note of how the washers were installed.
Unclamp the stock footpeg and replace it in the vice with a solid footpeg. Smear some grease onto the footpeg shaft where the brake pedal rotates. Then slide your brake pedal, along with any washers, onto the footpeg, and place your footpeg plate or rearset onto the footpeg, lining up the slots in the plate with the tabs on the footpeg. Squeeze some blue loctite onto the footpeg bolt threads and install and tighten the footpeg bolt. Repeat these steps with the left side footpeg, shift pedal, and footpeg plate or rearset.
Now is the ideal time to drill and safety wire the footpeg bolt. Even with blue loctite and plenty of torque we've seen footpeg bolts loosen and it's easier to just drill and wire the bolt now than deal with a loose footpeg during a race. Safety wiring is covered in detail later in this article.
After you've finished putting together your footpeg assemblies (if assembly was necessary), bolt them onto the bike using blue loctite. Bolt your rear brake master cylinder onto the right side using blue loctite, and reconnect the master cylinder to the brake pedal. If you're reversing your shift pattern, remove the shifter from the shift shaft, flip it so that the input force required to upshift and downshift are opposite that of stock, and reinstall it. When you tighten the bolt, wiggle the shifter around on the shaft to see if there's any movement between it and the splines on the shift shaft. If there is, tighten it a little more because as parents of racebikes it's our responsibility to ensure that our shifters get no play.

Shifter rod bolt wired to the shifter, and shifter bolt wired.
We recommend that you drill and safety wire the bolt that clamps the shifter to the shift shaft to ensure the shifter will not come off, although we are appreciative of the advantages we've gained through the racebike preparation war. There's nothing quite like seeing your competition coasting down hot pit lane with their shifter dangling from the shift shaft under a green flag during a close race to remind you how worthwhile those extra few minutes in the garage can be.
Next, install the shift rod. If you're using rearsets that came with a shift rod, use the shift rod provided. Then, while sitting on the bike, check your brake and shift pedal height. Use the adjuster on the rear brake master cylinder to set the brake pedal height. Screw or unscrew the shift rod to set the shift pedal height, but make sure that at least 1/3 of the threads on either side of the shift rod are engaged. If you can't get the desired shift pedal height using 2/3 of the total travel on the threads, remove the shifter from the shift shaft and rotate it on the splines and try again. Once you've set the shift pedal height, tighten the locknuts on the shift rod. Both of the locknuts. And remember that one is left-hand thread.
You can throw in an extra level of complication by installing a quick shifter into the shift rod assembly, which may also require some custom adjustments to the length of the rod. Keep a hacksaw and a file handy.
Some rearsets offer additional adjustability such as footpeg orientation—you can change the vertical and horizontal alignment of the footpegs by moving an intermediate plate or relocating the footpeg to another hole. We usually end up doing this kind of fine-tuning at the track, but remember that any change you make to the footpeg location will require checking and possibly re-adjusting the shifter and brake lever positions too.
Installing Your Frame Savers
Your frame savers should come with directions, but generally speaking you replace an engine mounting bolt on each side of the head with the frame savers and bolts provided. If one frame saver is longer than the other one or has a shoulder that should fit into a countersunk bolt hole in the frame, make sure you bolt each frame saver to the correct side—they should stick out about the same amount. Use the factory torque specification if a torque spec is not provided with the frame savers. You will most likely need to cut or enlarge at least one hole in your bodywork for the bodywork to fit over the frame sliders, but you'll have much more control over the size and location of the frame saver hole than you would over the holes that the pavement will cut in the bodywork if you don't install the frame savers.
Safety Wire Drilling and Wiring
For safety wire drilling you'll need 1/16" drill bits, and lots of them. Drilling safety wire holes is a skill that you develop over time, and during that time you will sacrifice many drill bits. A practiced driller might get 6-10 holes per bit, depending upon the material being drilling and how impatient the driller is with the process. We get our drill bits in bulk from McMaster-Carr (www.mcmaster.com), part #29115A711.

Tim demonstrates proper safety wire drilling technique, with a steady
braced and and firm pressure. He'll drill all the way through this bolt to
double the options of where to attach the safety wire for the most
effective pull once the bolt is re-installed.
Safety wire comes in different gauges or thicknesses. The most popular are .025" and .032". .025" wire is a smaller gauge and is very easy to work with as it is so pliable, but it also is more fragile and breaks too easily, even just under vibration. Which is why we use .032" - still small enough to manipulate easily but much more resilient. It is also available from McMaster-Carr, part #8860K63 for a 1 pound coil.
Refer to your racing organization's rulebook for a list of what all needs to be wired. If you race with more than one organization, use the most stringent rulebook. Even if your organization doesn't require it, it's a good idea to also wire your axles, brake caliper bolts, shifter bolt, footpeg bolts, and particularly the steering damper bolts.
Whenever possible, unbolt the bolts you are drilling and clamp each one in a vice to drill it rather than drill it on the bike, but make sure you drill the hole in a spot that is accessible once the bolt is installed. Pick your spot and use a punch to mark it.
Install a drill bit into the drill so that the fingers on the drill almost touch the grooves on the bit. That way the bit won't flex too much while you're drilling. Pour a little bit of light oil (like motor oil) into a small container (something handy, like the lid from a contact cleaner can) for dipping the drill bit in periodically to keep it cool. Dip your drill bit into the oil, place it against the bolt in the punched spot, and pin the throttle on the drill while exerting mild pressure against the bolt. Reminder: the drill must be set on forward for the bit to cut into the bolt. No amount of cursing at or pressing against the bit will change this rule, and you will feel really stupid when Tim comes over to investigate all the fuss and looks at you dubiously as he flips the direction from Reverse to Forward.
If you are drilling a particularly deep hole, pull the bit out as it's spinning a few times while you're drilling to remove the metal shavings, and dip the bit in oil again to cool it.
We've found that a deep vibration in the bit is indicative of imminent bit breakage so if a vibration develops it is usually a good idea to change bits before the bit breaks off in the hole, as we've also found that it is impossible to install safety wire into a hole that is occupied by a busted drill bit.
Once you've drilled and reinstalled your bolts, pick the spots on the bike that you will wire the bolts to. Plan it so that when the bolt is wired, the wire will pull the bolt clockwise, exerting a tightening force if the bolt tries to loosen. Cut a piece of safety wire that, when doubled over, is about 1/3 longer than the distance between the bolt you are wiring and what you are wiring it to. If you're not sure if the piece you're about to cut is the right length, err on the longer side.
Take your piece of wire and feed one end through the bolt hole until it is even with the other end. Pull both ends of the wire tightly in the direction of the object you are wiring to, bring the two wires together and clamp your safety wire pliers on them next to what you are wiring to. Pull the twist knob on the pliers to twist the strands together, and release the knob and pull again until you have a nice consistent tight twist down the length of the wire.
Next, take one of the loose ends of the wire and feed it through the hole in or wrap it around the object you are wiring to. Then bring the two wire ends back together, clamp them in your safety wire pliers, and twist again. Unclamp your pliers and trim off the excess wire. Leave about 1/4" of wire sticking out so you can loop the end back on itself to prevent it from impaling anyone working on the bike.
For bolts that are always being removed or loosened, such as brake caliper bolts or axle pinch bolts, we use cowling safety pins available from Aircraft Spruce (www.aircraftspruce.com, part #AN416-1). For axles we use hairpin hitch pin clips, also available from McMaster-Carr. You can clip the pin onto the bolt and safety wire the pin onto a fixed point on the bike.