No matter how much power your engine makes, it will do you absolutely no good if the bike’s chassis is the limiting factor. Although most modern sport bikes have suspension that is far superior to the stock suspension shipped with bikes ten years ago, they still tend to be primarily engineered for a sedate street pace with soft springs and incomprehensible valving choices by the OEMs. At a number of late-model press launches, the factory technicians who prepared the bikes for the journalists had set the rear rebound damping adjuster at full hard or one click off of full hard. You would think that at some point they would recognize that if they are shipping the bikes with a suggested setting of “full hard,” they might want to rethink the valving selections they are making at the factory.

Sam Fleming testing suspension grease at Summit Point Raceway.
Until the factories decide to up the specification on the stock suspension, building a front running supersport-based race bike is going to mean hitting the checkbook for a few purchases. On the 1000s built in this series of articles we replaced the cartridges and springs in the forks, replaced the rear shock, baselined the sag and damping in the garage, and then tuned the front and rear ride height at the track. In the process we disassembled most of the chassis to grease and adjust all the major suspension bearings. The R and R of the suspension will be covered in this installment; the tuning of the components will be covered separately.
In the dark days of the early nineties when we used square wooden wheels and friction damper suspension, we did our own fork work. However, the modern cartridge forks (and especially the inverted forks) usually require special tools to disassemble them without harming the workings of the damper and are generally a pain in the ass to work with, and so for the last couple of decades we have taken to contracting out our fork work.
There are a number of good shops in the country for fork work. Over the past 13 years we have used forks from Lindemann Engineering, Traxxion Dynamics, and Ohlins. There are really three main factors we consider when we get ready to send out a set of forks. The first is reputation (i.e., did we like the work in the past, did others like their work in the past); the second is trackside support (i.e., will the guy who worked on the forks be at the track to help tune them, replace seals when they blow and perform other trackside support services); and the third is price. Although the professionals will be able to get your bike in the ball park, perhaps even to the 90% level, we always end up making some adjustments to the forks specification ourselves (usually fork oil level but sometimes springs and almost always the damping settings).
Our favorite forks in the past have had Ohlins or Traxxion internals. For this build we used Traxxion cartridges and springs kits.
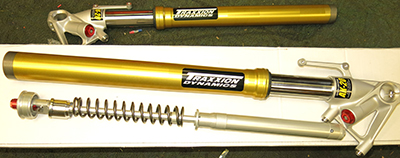
The stock cartridge is shown below the set of reworked forks. Note that
Traxxion has fitted different fork caps to allow running the forks lower in
the trees than stock. This is not required with the Michelin front tires but
bikes running other brands with lower profile front tires may benefit from
being able to adjust for the loss in trail.
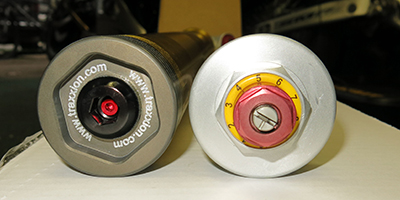
Note that Traxxion (left) is using a different top from the stock forks (right)
which requires a special tool. We made sure to get one into our Hindenbox
so we can adjust fork oil height at the track.
We usually hang the bike from a garage rafter using a couple of soft ties and a come-along to remove the forks. Our garage beams date back to the era of old growth trees so if your house is built with stucco and chicken wire you might need to use alternate stands. Once off the bike, the forks are pretty delicate pieces and should be packaged for shipping with a fair degree of paranoia before entrusting them to UPS.
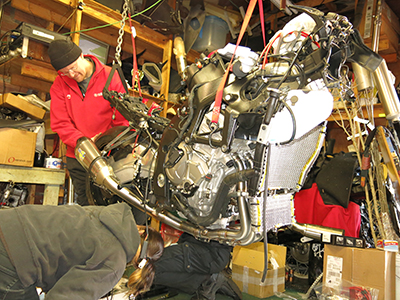
Brunhilde (the motorcycle) is dangled from tie-downs and chains so
authors (from left) Tim, Melissa and Sam (other side of the bike) can
work on suspension and various other aspects of the build.
While the forks are away for surgery you can tend to a few other items of business. The first is the suspension bearings. The Japanese might not have invented the concept of planned obsolescence but they have certainly done an admirable job of instituting it. One of the most visible manifestations of this is the fact that Japanese motorcycles are shipped with only the most parsimonious allotment of grease in the steering head bearings. With the forks away and the chassis suspended by soft ties through the frame (not the top tree) it is a pretty simple matter to remove the trees and thoroughly grease the steering head bearings. We usually keep a tube of synthetic grease around for this purpose. The Germans apparently have ample grease supplies in their factory so the BMW's bearings looked pretty good from the factory.
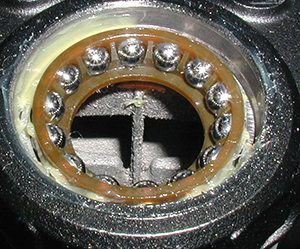
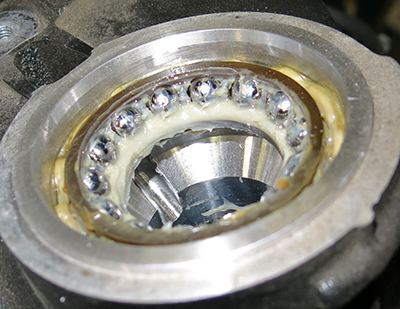
Apparently there is some sort of endemic shortage of
grease on the Japanese assembly line. This is a classic
example of what you can find on the steering head
bearings of any brand new Japanese showroom model.
You really shouldn’t be able to see that much shiny metal.
BMW apparently is willing to put an extra seven cents
of grease into each bike. That is probably how they
can maintain their aspirational premium branding.
In the bad old days motorcycles came with loose ball bearing head bearings. These had the average life expectancy of a tsetse fly and the trick upgrade on your RD350 was replacing the ball bearings with tapered roller bearings. The tapered bearings had a much-improved life (probably because when they were installed the owner usually greased them at the same time) but had to be adjusted very carefully. Even slightly over-tightening a tapered roller bearing steering stem will cause the bike to wander drunkenly akin to a steering damper that is turned up too high. On streetbikes an indication of notched or overly tight steering bearings is the bumping of car mirrors with your handlebars while lane splitting. In the mid-nineties the trend reversed and most bikes now come with ball bearings again, although the bearings are now captive. These suffer from the same durability issues of their ancestors (we have had bikes come brand new with corroded head bearings) and it is very important to grease the snot out of them. Another downside to the trend back to ball bearings is that in a pinch (say, North Carolina at 2:00 a.m. on a Sunday) you could pull the tapered roller bearing out of the steering head on your FZR 400 and use it to replace the smoked wheel bearing on the van to get the rig twenty miles down the road to the next auto parts store with Sunday hours, but you can’t do that with the ball bearing type.
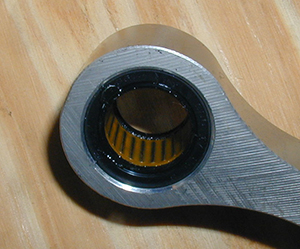
Where’s the grease? Here’s a practically naked rear
suspension linkage dog bone on a Yamaha. Children,
cover your eyes.
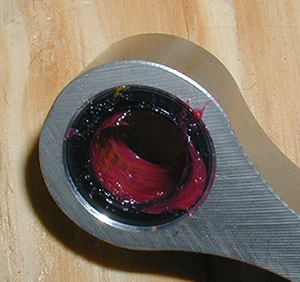
There’s the grease. Remember, this is America,
and more is better.
If you asked a suspension tuner what the most commonly overlooked handling problems were, he would probably say “tire pressure” closely followed by “loose head bearings.” Since most racers use rear stands and have steering dampers installed, the head bearings will rarely be checked for condition or adjustment. This is a big mistake. Head bearings usually corrode or notch with a groove right in the middle of steering travel, i.e. when the wheel is pointed straight. The swingarm pivot on some bikes has a large enough inner diameter to pass through a 5/8” rod that can be used as a support to pivot the front end up in the air for quick checks. We have a purpose built stand for this although Pit Bull sells one as well. This stand also allows removal of the rear shock and wheel without garages and rafters.
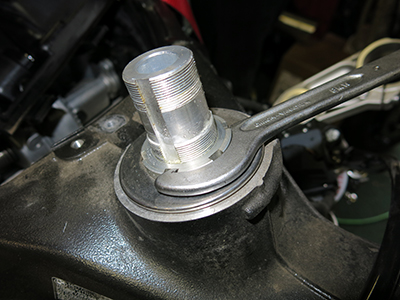
After you’ve drowned your bearings in grease, it’s time to adjust them.
With the top triple clamp off but the forks and front wheel installed,
remove the lock washer and loosen the locknut. Tighten the adjuster nut
(the one on the bottom) until you feel a slight bit of friction when turning
the front end just off of center but the front end will still gently fall to one
side, and them jam the locknut against the adjuster, holding the adjuster
nut to make sure it doesn’t spin. We find the spanner wrench included in
a 1970 stock BMW motorcycle toolkit to be especially handy for adjusting
these nuts. When you have the proper feel, install the lock washer, the top
triple clamp, and the steering stem washer, and then tighten the steering
stem nut to spec. Then, check the feel again. If there is too much friction
in the side-to-side movement or if you feel any notchiness, back everything
off and try again. Typically the bearings will tighten dramatically when you
torque the top nut.
With the front end unweighted (i.e., the bike suspended from the frame or pivoted up around a swingarm stand) and the steering damper REMOVED, the steering should move freely side to side with absolutely no little faint notch in the middle. Any notchiness means it is time for new head bearings (and this time put some grease on them). There should also be absolutely no free play front to back on the forks when pulling and pushing them from the bottoms of the fork legs. If there is any free play, the steering bearings need to be tightened. If you have to adjust them and you have clip-ons installed under the top triple clamp, remember to loosen the clip-ons before performing the adjustment. After tightening the bearings, feel for a notch again.
Without a steering damper on the bike, we aim for a front end which will just fall to the side under its own weight with the fork tubes and front wheel installed and after the top nut has been torqued, but which has no free play front to back. Those top nuts seem to fall off a lot at the track (we've had it happen too) so many people (including us) seem to have a problem with tightening them to spec. Tapered head bearings are much more sensitive to adjustment than the ball bearings, which is probably why ball bearings have come back into fashion. Overly tight head bearings make the bike wander at low speed and make it difficult to hold a line. Loose head bearings will allow the bike to wobble at speed and especially on deceleration, and generally result in loose and imprecise steering as well as increased tendency towards front end chatter.
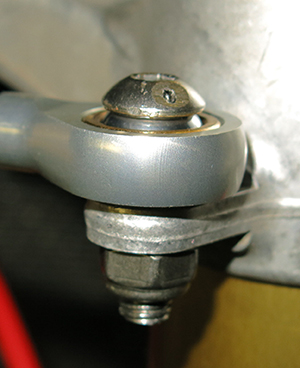
It's often a PITA but after seeing enough tragedy from
folks not doing it, we drill and wire the damper bolt.
We ground a flat on the rounded bolt with the Ohlins
damper to make it easier to drill. This will be wired
before the bike is done.
While you are working around the triple clamps, drill and wire the mounting bolts for your steering damper. Many preventable crashes have been caused by one of the mounting bolts or nuts falling off of the steering damper which then, at best, no longer damps the steering, and, at worst, wedges the forks to one side or another. These bolts are subject to a lot of twisting motion from the damper working back and forth on them, which is probably why they have a tendency to loosen more so than, say, a rear set bolt. These bolts are often supported on one side, in single shear, so it’s not a bad idea to replace them every now and again with new ones from a reputable bolt manufacturer. Read Carroll Smith’s Nuts, Bolts and Fasteners and Plumbing Handbook (known affectionately to many as Screw to Win) for chilling tales of counterfeit bolts and bad design.
Once you are sure you have achieved steering head bearing adjustment nirvana, our recommended tightening sequence for the remainder of the front end is as follows:
1) Snug down the top triple clamp fork pinch bolts.
2) Loosen the bottom triple clamp fork pinch bolts.
3) Loosen the fender mount bolts.
4) Loosen the axle pinch bolts and axle.
5) Set your fork height and tighten the top fork pinch bolts.
6) Tighten the bottom fork pinch bolts.
7) Tighten the axle.
8) Tighten the axle pinch bolts.
9) Tighten the fender mount bolts.
10) Adjust and tighten the steering damper clamp where applicable.
11) Adjust and tighten your clip-ons.
Then, check your front-end alignment, which is usually best done by riding the bike and making sure that the triple clamps point in the direction the bike is going. If your alignment is off, loosen everything and tweak accordingly. If you continue to have trouble with the alignment, check to see if your axle spins smoothly and if you can slide the forks easily through the triple clamps. A sticky fork or binding axle is indicative of a bent axle and/or front end.
Make absolutely certain that all bolts (triple clamp, clip-ons, axles, etc) are torqued when you finish messing around with the front end. Marks punched into the triple clamp can help with aligning clip-ons in a hurry after adjusting the front end.
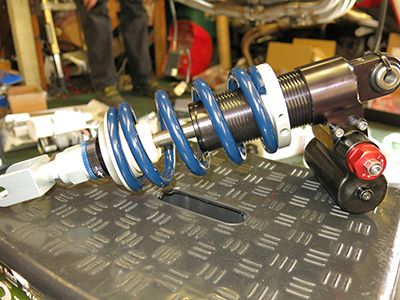
A beautifully sculpted and very light JRI shock. Note high and low speed
compression adjusters on the piggyback reservoir, the blue rebound
adjuster on the bottom, the ample ride height adjustment (not needed
on the BMW but always appreciated) and the spring preload adjuster
that can be unscrewed to replace the spring without special tools.
Most factories are a bit better about greasing the rear suspension bearings than the steering head bearings but it is still worth the time and effort to remove the swingarm and suspension linkage from the frame and thoroughly grease all the bearings. These linkages have a very hard life and will tend to start showing free play pretty quickly which leads to imprecise rear suspension action. With the bike hung from a chain and the rear wheel removed, it is pretty easy to feel any free play in the shock linkage just by pulling up and down on the swingarm rails. Changing out all the bearings and sleeves is a real pain in the ass so it is much better to grease them thoroughly when new and try to eek all the life out of them that you can.
As a side note, if you are switching to 520 chain and sprockets and do not have the tools to install a rivet-type master link in your new 520 chain, take the chain to a dealership, get it cut to the proper length, have them install the masterlink, and then install the whole “endless” chain on your bike while you have the swingarm off. If you have a bike that has a braced swingarm (ala R6, GSXR 750) you will need to bring the swingarm with you to the dealership so they can thread the chain through it before installing the rivet. Or you might consider investing in the rivet link tools instead.
After re-installing the swingarm and one or two of the bolts of the shock linkage, we install our high dollar race shock. In the past we used Fox (yes, we're that old), Ohlins and Penske. Of those our favorite was always Penske; however, Penskes became incredibly expensive in the last couple years and they wouldn't give us shocks for the BMWs. We were put onto JRI shocks who have been steadily building up their motorcycle racing presence. They sort of remind us of Penske from ten years ago.
Although there is no doubt that Ohlins builds beautiful pieces, in my experience the shocks are not built with a club racer in mind. The range of adjustments on the shocks are very small, requiring shock disassembly for re-valving. Also, most of the shocks require a spring compressor to change spring rates. All of that is fine if there is a big Ohlins truck waiting at your beck and call but in the world we race in, that resource is seldom available.
Both Penske and JRI have better "at track" serviceability for spring changes and wider ranges of adjustment for damping settings. We only have one season with the JRI shocks and they are beautifully manufactured and robust. They seem a tad lighter in weight to the Penske and I believe they are much less expensive. Both the top bikes in the 2013 WERA endurance series (we were one of them) were running JRI shocks.
The question of which shock to use really comes down to the same criteria as the forks; namely, trackside support and price. If your local suspension consultant is an expert with Penske shocks, you are probably better off getting what he is familiar with than getting a different brand and trying to find a set-up on your own. At a minimum it prevents you from having the guy tell you “Those <insert the name of your shock> aren’t worth shit, you need a <insert name of shock he sells>.”
Whatever you decide to use, make sure you torque all the bolts to the specification in your shop manual and make sure you don’t let anyone interrupt you while you are performing this most delicate task. Also, we try to feed the bolts in from the side away from the exhaust pipe to allow us to remove the shock or change springs without having to disturb the exhaust. It is a very good idea to make sure that the shock reservoir has ample clearance to the rear wheel as we’ve seen this cause accidents when the rear wheel wedges on the reservoir. We’ve also seen the older style rubber hose (Ohlins) from the shock to the reservoir rub through on the rear tire of a bike, with ugly consequences. We typically use really thick and heavy-duty cable ties to secure the reservoir because they’re handy. If you decide to use hose clamps, make sure that you only tighten the hose clamps on the ends of the reservoir to prevent distorting the reservoir and keep the internal piston from moving freely.
Of course, removing your suspension and putting it back is only part of what goes into making the bike much better so in a later chapter we will discuss what all of that rake, trail, spring rates and damping mean.
